QGIS is a Free and Open Source Software, developed by a growing community of individuals and organisations.
Installation
You can download the latest version of QGIS from here. On that page, you can find the appropriate QGIS installation package for your operating system.
If you are a MS Windows user, you have 2 options: the standalone installer or the OSGeo4W installer, each of which has its own strengths:
- OSGeo4W Installer Strengths
- Access to the "master" (development) version of QGIS which means you can make use of the latest (yesterday's) cutting-edge features
- Access to QGIS-Server (which allows you to publish your maps through a Web Mapping Service)
- Standalone Installer Strengths
- Simplest method of installation
Starting QGIS
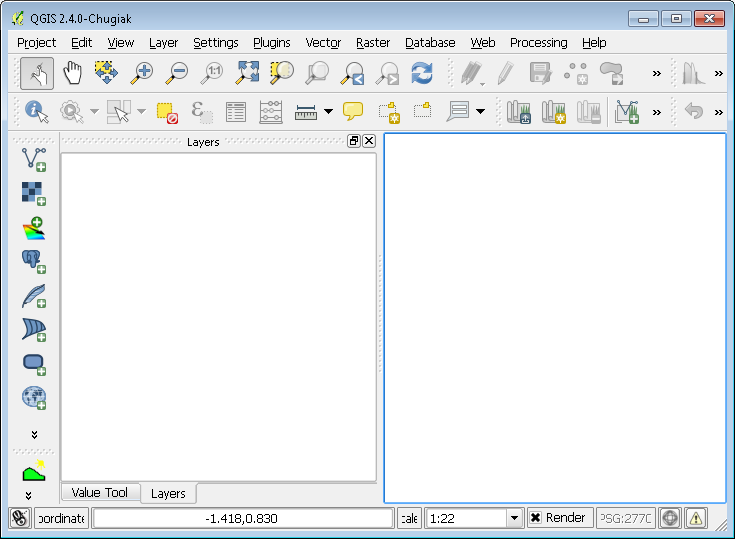
Once you finish installing QGIS, you can find its icon on your desktop and/or Start menu. Launch QGIS and wait for the application to start. If you're a MS Windows user, QGIS might take some time to start up for the first time but subsequent loads will be much faster.
Arranging tool-bars
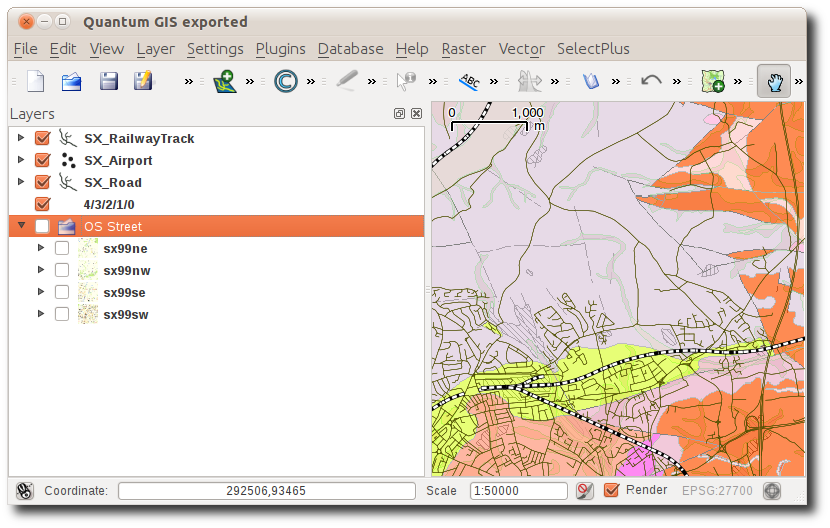
QGIS features a number of tool-bars. You can move them around by clicking and dragging the vertical or horizontal dotted bars separating the tool-bars (for example, the bar to the left of the help tool's icon in the image above).
Setting the Coordinate Reference System (CRS)
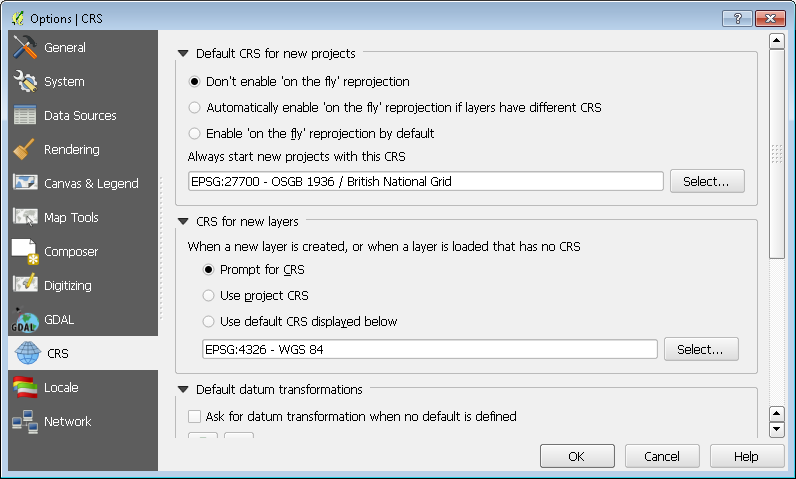
It is recommended to set the Coordinate Reference System (CRS) for your project before adding any data. CRS or SRS is a coordinate-based local, regional or global system used to locate geographical entities. Many CRSs are available and each is suited to a particular area of the globe. There is a comprehensive list of CRS codes available here. In this example, we will set the CRS to match the British National Grid coordinate reference system. The easiest way to search for a specific CRS is using its unique EPSG code. The EPSG code for British National Grid is 27700.
To set the CRS for your projects in QGIS, from the main menu, select Settings > Options. A new window will appear. Select CRS tab.
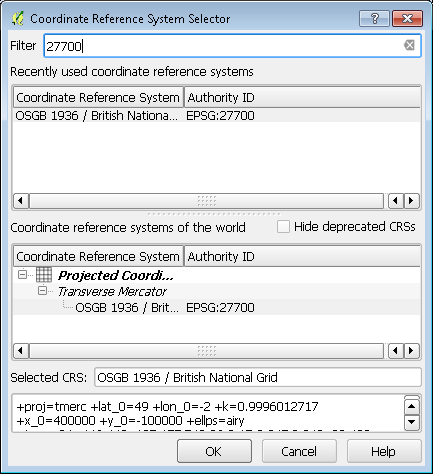
In the Search section, set Authority to "EPSG" and Search for to "ID". Type 27700 into the search box and click Find. Highlight the correct row in Coordinate Reference System section and click OK.
Adding data
GIS data is usually in either raster or vector format. QGIS supports a large number of GIS data formats through the GDAL/OGR library and other plugins. In the example below we will download and add some OS OpenData™ raster and vector datasets into QGIS.
Raster
Ordnance Survey released a number of OS OpenData raster datasets to the public under a very permissive license. You can download the data from here.
For this particular example, follow this link and browse to OS Street View®. Select SX from the map. Move towards the bottom of the page and click next. Fill in the required information and click continue. You should receive an email with a link to download osstvw_sx.zip (note: it is a 383.9 MB file - you can order a DVD instead if you have a slow internet connection). Once the download has finished, unzip the file. You should now have a new folder called OS Street View SX which contains 2 subfolders and a readme file.
Browse to Street View SX > data > georeferencing files > tfw. Select all the TFW files and move them to the Street View SX > data > sx folder. The TFW files contain georeferencing information describing the location of each TIF file.
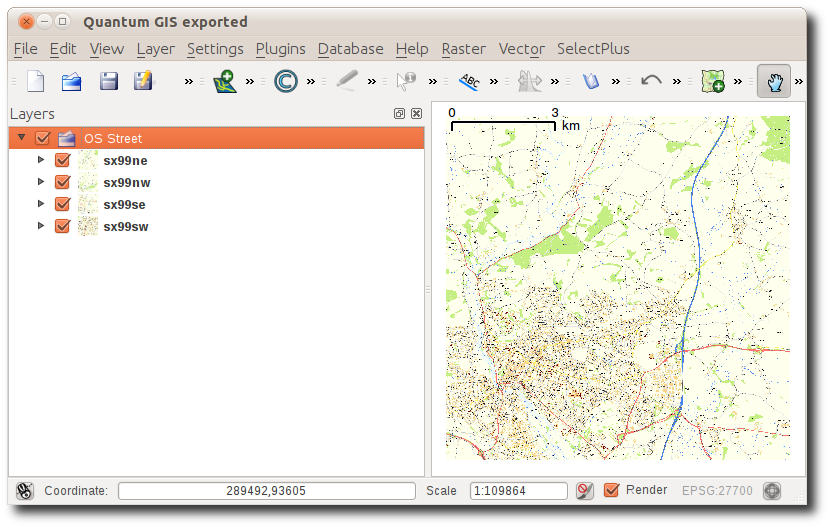
In QGIS, from the main menu, select Layer > Add Raster Layer... and browse to the Street View SX > data > sx folder. Select sx99nw.tif, sx99ne.tif, sx99sw.tif and sx99se.tif. Click Open. You should now be able to see the raster tiles in the QGIS canvas and the Layers panel at the left side of the screen.
Raster files do not always contain CRS information. We can easily organise the layers and assign the correct CRS (EPSG:27700) with the help of groups. Create a new group by right-clicking on the blank space (not on the sx99 layers) in the Layers panel and selecting Add group. Set the name of the group to OS Street View. Next, move the sx99 layers into the new group by selecting them all and dragging them into the OS Street View group. Once all the sx99 layers are inside the OS Street View group, right-click on the group and select Set group CRS. A new dialog, similar to that seen in the Setting the CRS chapter will appear. Assign the British National Grid CRS (EPSG:27700) and click OK.
Vector
Next, we'll bring some vector data into QGIS. Go to the OS OpenData Supply page and browse to OS VectorMap™ District (there are two OS VectorMap datasets on this page, for this example, ensure you select the vector version and not the raster version) and select SX from the map. Scroll to the bottom of the page and click next. Fill in the required information and click continue. Download vmdvec_sx.zip from the link you'll receive by email. Extract the contents of the ZIP file.
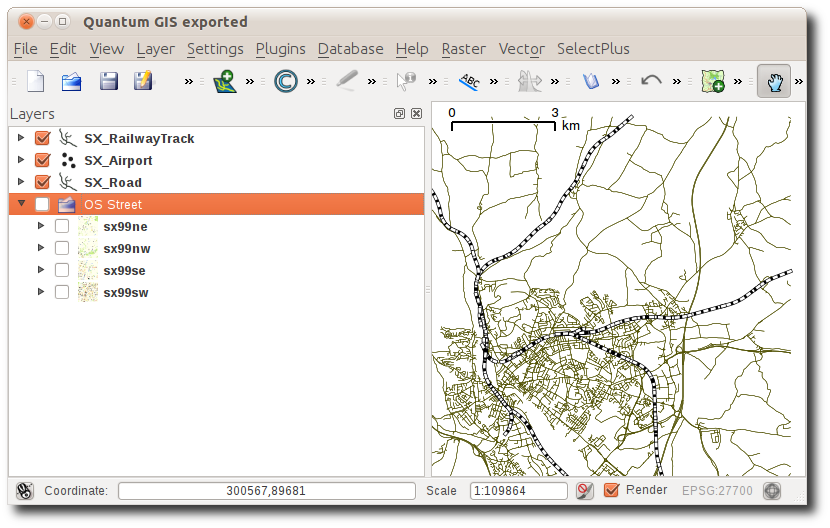
In QGIS, from the main menu, select Layer > Add Vector Layer... and browse to the OS VectorMap District (Vector) SX > data > SX. Select SX_Airport.shp, SX_RailwayTrack.shp and SX_Road.shp. Click Open. Click Open again.
To change the style of a vector layer, right-click on the layer in the Layers panel and select Properties. In the Style tab of the Layer Properties dialog, you can define exactly how the layer should look.
Other Data
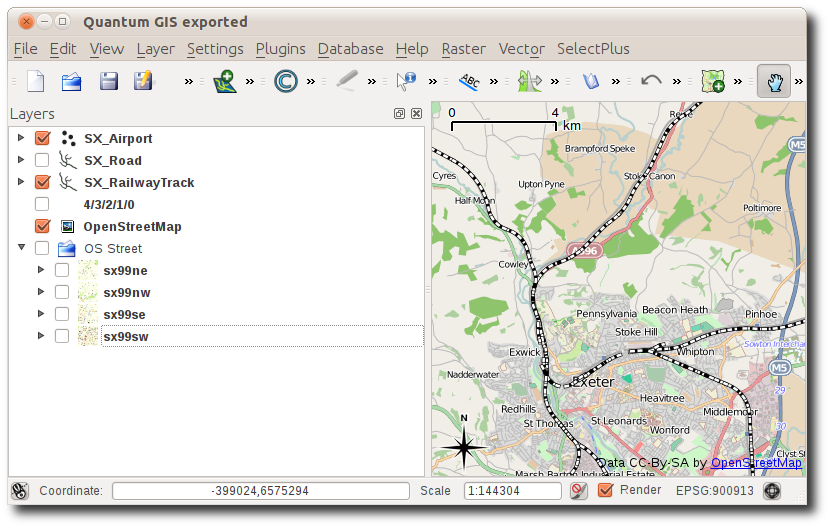
Internet based mapping can also be brought into QGIS, for example, a plugin exists that allows OpenStreetMap, Google, Bing and Yahoo maps to be added to QGIS.
Web map services (WMS) are another source of mapping data. In the next we'll add a WMS layer provided by British Geological Survey to our map. Please read the BGS WMS Terms of use. Another example of WMS is Ordnance Survey's OS OnDemand service. If you have OS OnDemand license, you can follow the instructions on Ordnance Survey's website (sorry, link no longer works) to add other useful WMS layers.
To add the BGS WMS, select Layer > Add WMS Layer... from the main menu. The Add Layer(s) from a Server dialog will appear. Click New.
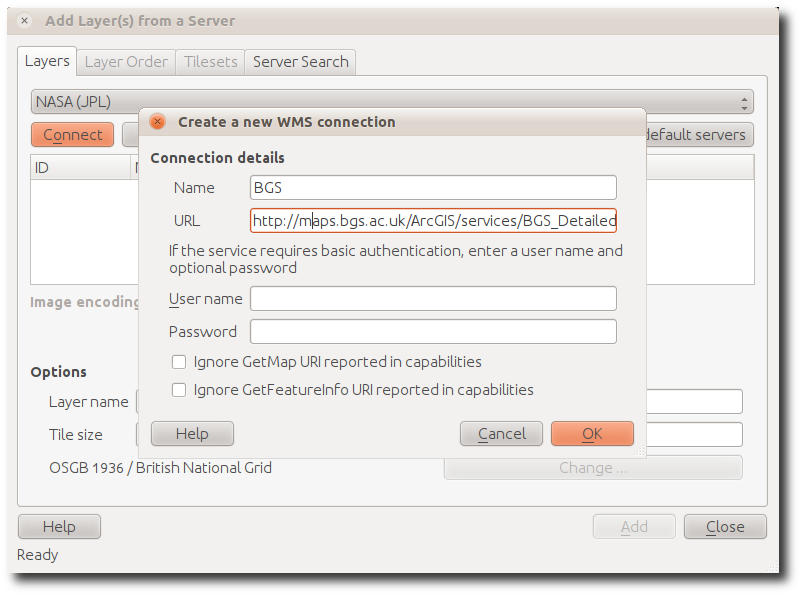
Set the name to BGS and set the URL to the following:
http://maps.bgs.ac.uk/ArcGIS/services/BGS_Detailed_Geology/MapServer/WMS...
Click OK, and in the Add Layer(s) from a Server dialog, click Connect.
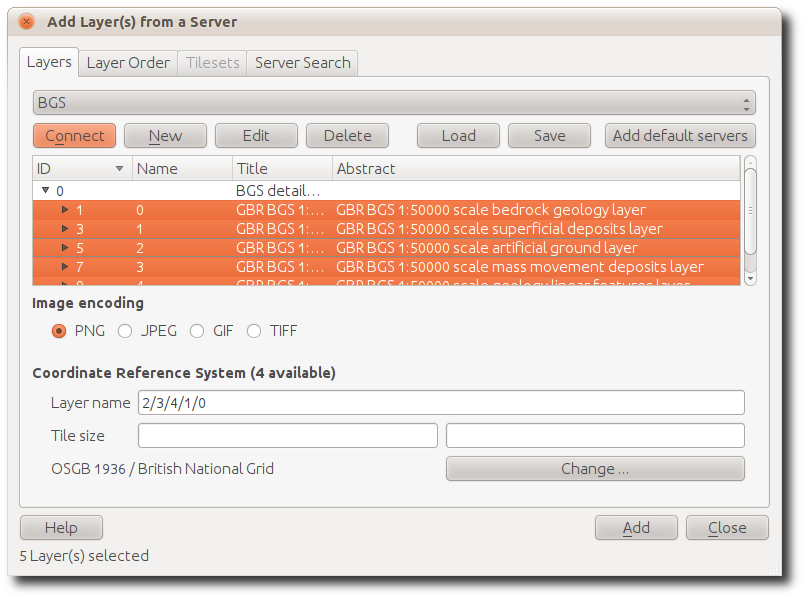
Select all the layers and click Add. Close the Add Layer(s) from a Server dialog. The BGS layer should become visible as you zoom-in to a scale of 1:50000 or closer. Alternatively, you can manually set the Scale in the status bar to 1:50000 and the BGS layer will appear.
Plugins
QGIS is written in a manner that makes it possible for anyone it extend its functionality through the use of plugins. As a result, there are many plugins available to the user, making QGIS highly modular and flexible.
Core plugins
Core plugins are plugins that are shipped with QGIS and can be optionally enabled through the QGIS Plugin Manager. To access the QGIS Plugin Manager, from the main menu, Select Plugins > Manage Plugins...
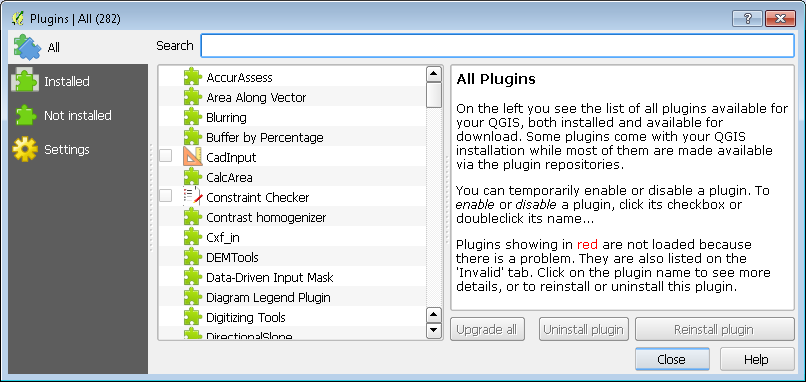
Select the All tab and type OpenLayers Plugin into the Filter box. Select the plugin and click Install plugin. You should now be able to add OpenStreetMap, Google, Bing and Yahoo maps to your canvas using the Web > OpenLayers plugin menu.
Further information
For further help using QGIS, you can always check the manual, user or developer mailing lists or QGIS forum.
If you'd like to master QGIS as quickly as possible, why not attend one of our training courses.
Troubleshooting
Installing OpenLayers Plugin
To install OpenLayers plugin, from the main menu, click Plugins > Manage and Install Plugins.... A new window will appear.
You should be able to search and install the OpenLayers plugin within your list.
Windows Installation
Although you can have different version of QGIS installed under Windows, it's recommended to uninstall old versions before attempting to install new versions.
On rare occasions, some anti-virus software has been known to remove the qgis.exe and python.exe files from the installation folder. If you're having problems running the QGIS shortcut, please ensure those 2 files exist in the installation folder.
If QGIS cannot find your Python folder, you may need to set the PYTHONPATH environment variable to your QGIS folder (\QGIS\apps\python).
Access to internet
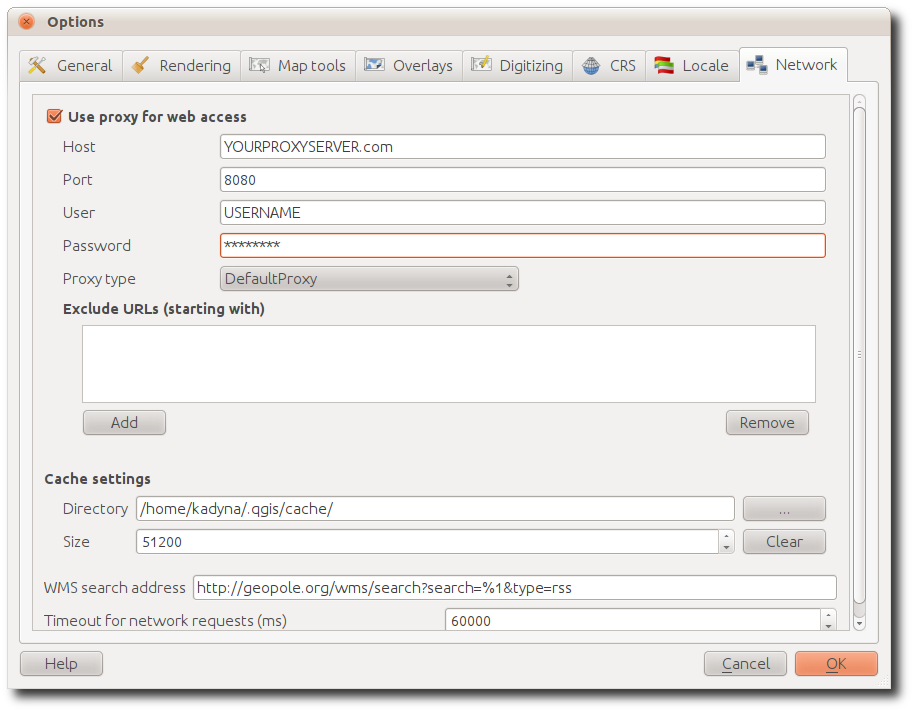
To be able to access WMS, WFS and 3rd party plugins, you'll need to have internet access. In the event that you're behind a proxy server, you can enter the proxy server details in Settings > Options > Network:
You may also like...
Mergin Maps, a field data collection app based on QGIS. Mergin Maps makes field work easy with its simple interface and cloud-based sync. Available on Android, iOS and Windows.