
With the new release of QGIS 3.42, we have introduced the possibility to edit point cloud (LIDAR) data directly from QGIS. In the upcoming QGIS 3.44 release, we are expanding the available point cloud editing tools. In this blog post, we cover the rationale behind those tools, challenges and also a quick demonstration of how you can edit your point clouds. Note to test all the tools showcased below you will need QGIS 3.43 or later versions.
You can also see a live demo of the tools by our colleague Martin Dobias.
After segmentations of point cloud data, it is often required to manually edit the classes and apply the correct values, for example:
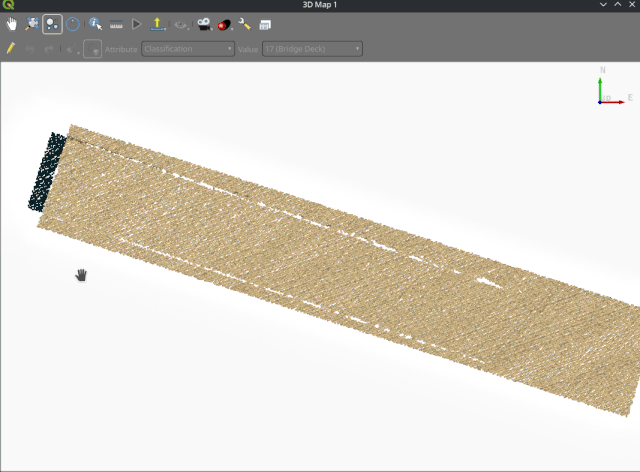
To be able to do the editing more efficiently, we have added a new feature in QGIS 3D map to generate 3D profile:

In the example above, we created a 3D profile of a section of the road which should have been classified as a deck.
Before editing point cloud data, it is important to note that only visible classes will be affected. So, if you want to edit a specific class, it is best to first make other classes invisible in the Layer Styling panel to avoid unintended edits.
In the example above for classifying the deck, all classes have been turned-off except for desk and ground data:


To start editing the point cloud layer, similar to the vector layer, you can right-click on the layer and select Toggle Editing. Alternatively, you can activate the editing toolbar in 3D map and press the pencil icon.

There are four new editing tools available in the 3D map toolbar:
The above tools allow you to select the points you want to edit. You can then change the filtering for the modified points to either include all the visible points or just the ones matching the filtering expression. As we have filtered out the points we do not want to edit in the previous step, we can skip this option.
Next, you need to select which attribute you want to change (e.g. Classification) and the target value you want to change it to. In our example, the Deck classification is 17.
In the above example, we have used some of the editing tools.
Notes:


The current point cloud editing tools are only available in 3D maps. At this stage, we feel the most appropriate place to edit the data is in the 3D scene. There are use cases where it would be more appropriate to use a tool in the 2D map (e.g. in conjunction with the Profile tool and Vertical Controller).
In the current tools, only editing of the COPC files are allowed. This is not a major issue as all LAZ/LAS files are automatically indexed to COPC files in QGIS.
Editing of X, Y and Z is not allowed within the tools. COPC files are indexed to be streamed efficiently in QGIS. Changing those values will mean re-indexing the file which can take a long time.
If you would like to see more editing features of point cloud and LiDAR data, please do not hesitate to contact us.
Addition of these tools were made possible by the funding from Danish Climate Data Agency and facilitated by Septima.
Let's make the QGIS work for you
Lutra Consulting is a QGIS-focused expert provider of geospatial software development, consulting, training, and support services.


.jpg)
